
Access Code Information
Affiliate Dashboard · General Reference
What Is an Access Code?
An Access Code is a single-line combination of letters and numbers that represents a credit for a user to access the Premium Dashboard — including the Work Personality Assessment, A3 Assessment, and all premium features.
Think of an Access Code as a pre-paid credit card that can be loaded with pre-purchased Premium Career Tests.
Access Codes can only be purchased inside an Affiliate Dashboard (Career Counselor Dashboard).
Access Codes allow you to:
- Send an examinee a career test from your dashboard, or set up larger groups to self-register
- View an examinee's results from your affiliate dashboard
- Receive email notifications when an examinee's test is completed
How to Bulk Purchase Access Codes
- Log in to your CareerFitter Affiliate Dashboard
- Select Purchase Access Codes
- Select the number of access codes you would like to purchase and click Continue at the bottom of the page to complete your purchase
 Watch: Bulk Purchase Video Tutorial
 How to Rename an Access Code to Prevent Further Use
- Log in to your Affiliate Dashboard
- Select Manage Access Codes
- Select Edit to the right of your access code
- Change the name of the access code and select Update at the bottom of the form
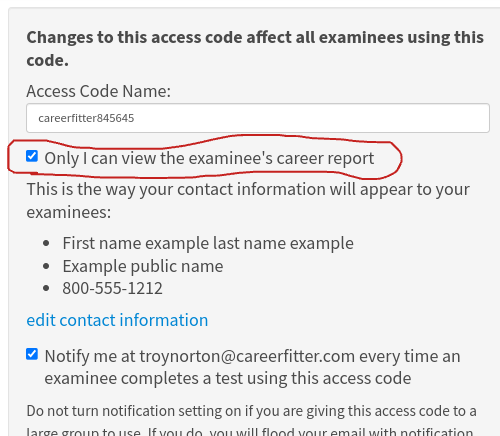
Access Code Restrict View Feature
When the Restrict View feature is on for an access code, the examinee can take the assessment but cannot view their results until you release them. This lets you preview results before the examinee sees them.
Turn On Restrict View
- Log in to your Affiliate Dashboard
- Go to Manage Access Codes
- Select Edit
- Check the box: "Only I can view the examinee's career report"
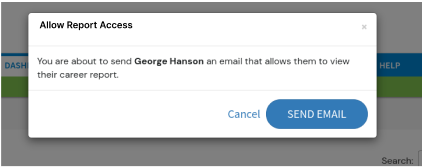
Allow an Examinee to View Their Results
Log in to your Affiliate Dashboard, then follow these steps to release results so the examinee can view them in their user dashboard.
- 1 Open Manage Examinees within your dashboard
- 2 Click the Allow Access button to the left of your client's name. If there is no button and they completed the assessment, they can already view their results when they log in.
- 3 After releasing access, the Allow Access button will disappear